new telescope
02 Oct 2018It’s been a while since my last update, so I’ll skip forward a bit and spare you all a lot of testing, successes and failures. First, I got a new telescope! I know, I know. It was a responsible purchase. I long ago came to the conclusion that the AWB Onesky 130 – while an excellent beginner telescope – is basically atrocious for photography (see above for reasons). I had a lot more success simply using my Canon 200mm + TC, despite the awful coma. While I did still spend some time waffling on the eternal reflector vs. refractor debate, I was quickly becoming enamored with the convenience/size of my lens vs. the bulkiness/unwieldiness of the reflector. I had read a lot about the Astro-Tech AT72EDII already, as it has a pretty good reputation as a relatively inexpensive doublet refractor, but they were out of stock on pre-order waiting for the next shipment to arrive. My waffling ended when someone on the /r/astrophotography discord mentioned he had one for sale. Done deal! It’s not terribly different from my lens + TC combo, with the exception that it’s, well, designed for astrophotography. Chief among the improvements are a silky-smooth dual-speed locking focuser and a solid 2” mount with a 1.25” adapter. This means I can mount my camera directly with a 2” adapter and take advantage of its full-frame sensor without vignetting. The downside is that this 430mm refractor probably isn’t as good for planetary stuff as a big aperture newtonian would be, but I feel comfortable with this compromise. Planetary stuff is fun, but I feel like it’s a bit limiting (there are only so many planets to take photos of).
The telescope arrived, and brought with it, of course, a week of rain. Once it cleared this past weekend I spent some time testing it out. Thus I came to the next dilemma: the only skyglow/light pollution filter I had was 1.25”. I’ve long been conflicted on the actual value of light pollution filters. Are they really necessary? Are the compromises worth it? Do I really want to put a $100 tiny piece of glass in front of my fancypants new telescope – effectively dropping the quality of light reaching my sensor to it as the lowest common denominator? Well, no way to know unless I tested. So, Friday night I gave it a whirl with the 1.25” adapter and the skyglow filter. Andromeda, as always, is my preferred target because it’s big, forgiving, and high in the sky – perfect for testing the relative merits of these difference approaches.
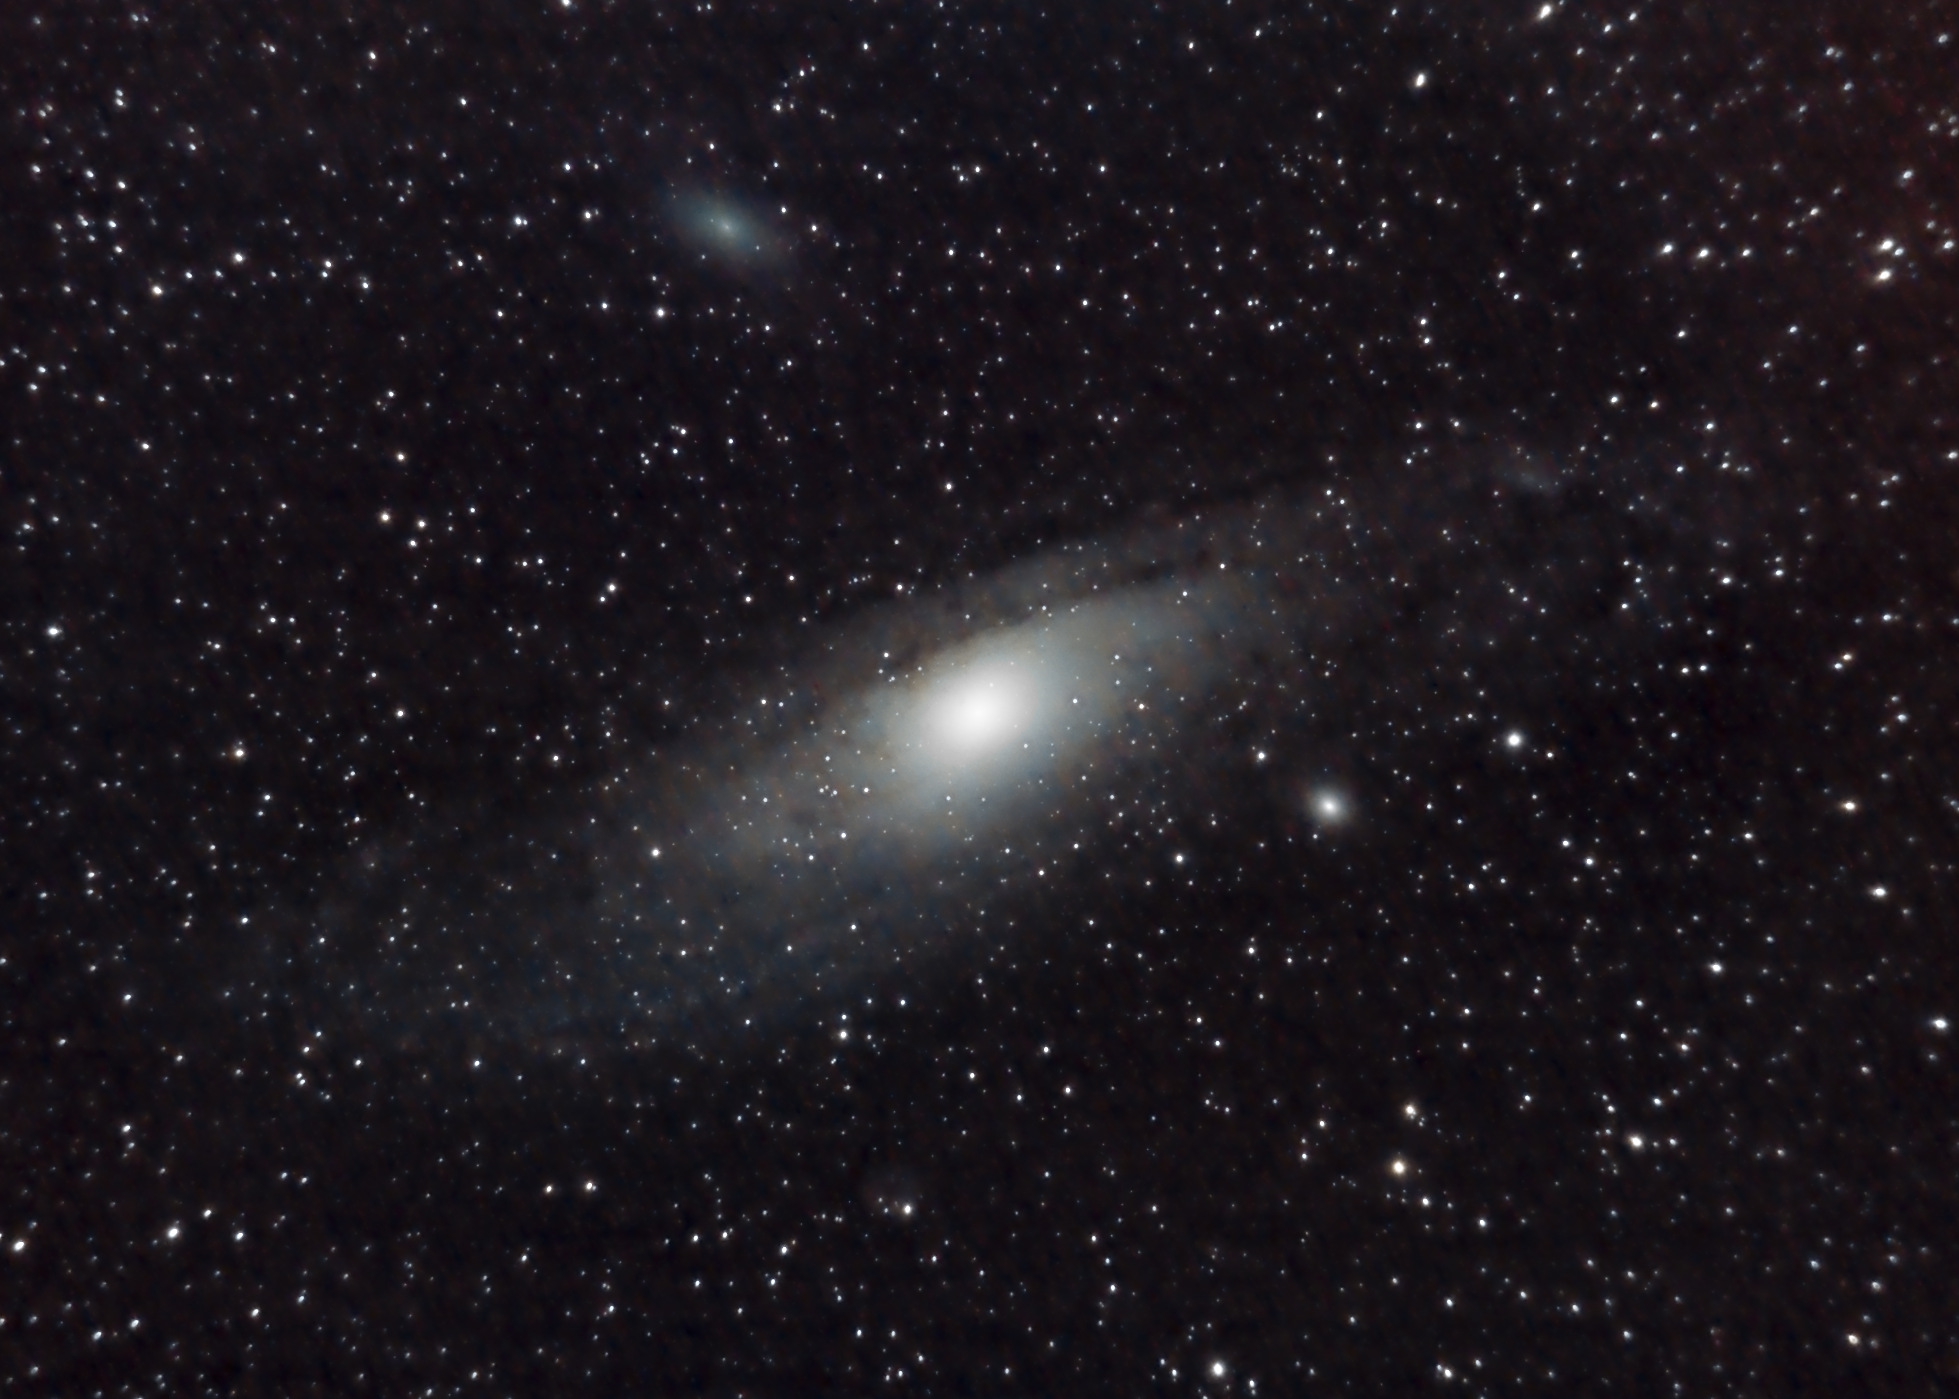
- Subject: Andromeda (M31)
- Camera: Sony A7S II
- Telescope: Astro-Tech AT72EDII
- Filter: Orion 1.25” Skyglow
- ISO: 1600
- Shutter Speed: 20”
- Light Frames: 60
- Dark Frames: 20
- Flat Frames: 20
- Offset Frames: 20
- Software: Pixinsight - DynamicCrop, DynamicBackgroundExtraction, Background Neutralization, Color Calibration, SCNR noise reduction, Histogram Transformation, Curves Transformation, Unsharp Mask
So, it kinda looked like shit. I had a lot of detail lost and no color evident. This wasn’t entirely a fair test because it was also extremely gross outside (90% humidity with dewpoint hovering right around ambient temperature), and so I didn’t do a super long set of photos. Nonetheless, it seemed somewhat evident to me that the filter was working against me in this case. Also evident is a lot of coma, which was expected – this is largely fixable with a field flattener, which I’ve already ordered, so hopefully that will be solved soon.
Saturday night I gave it another whirl with better conditions. I opted to test with the LP filter again, since it didn’t get a fair shake on Friday due to bad conditions. This time I also tried a larger number of longer exposures – somewhat bold, since it’d mean I’d be burned for the night if I screwed something up. The results were very encouraging though! Turns out more data is better, who knew:
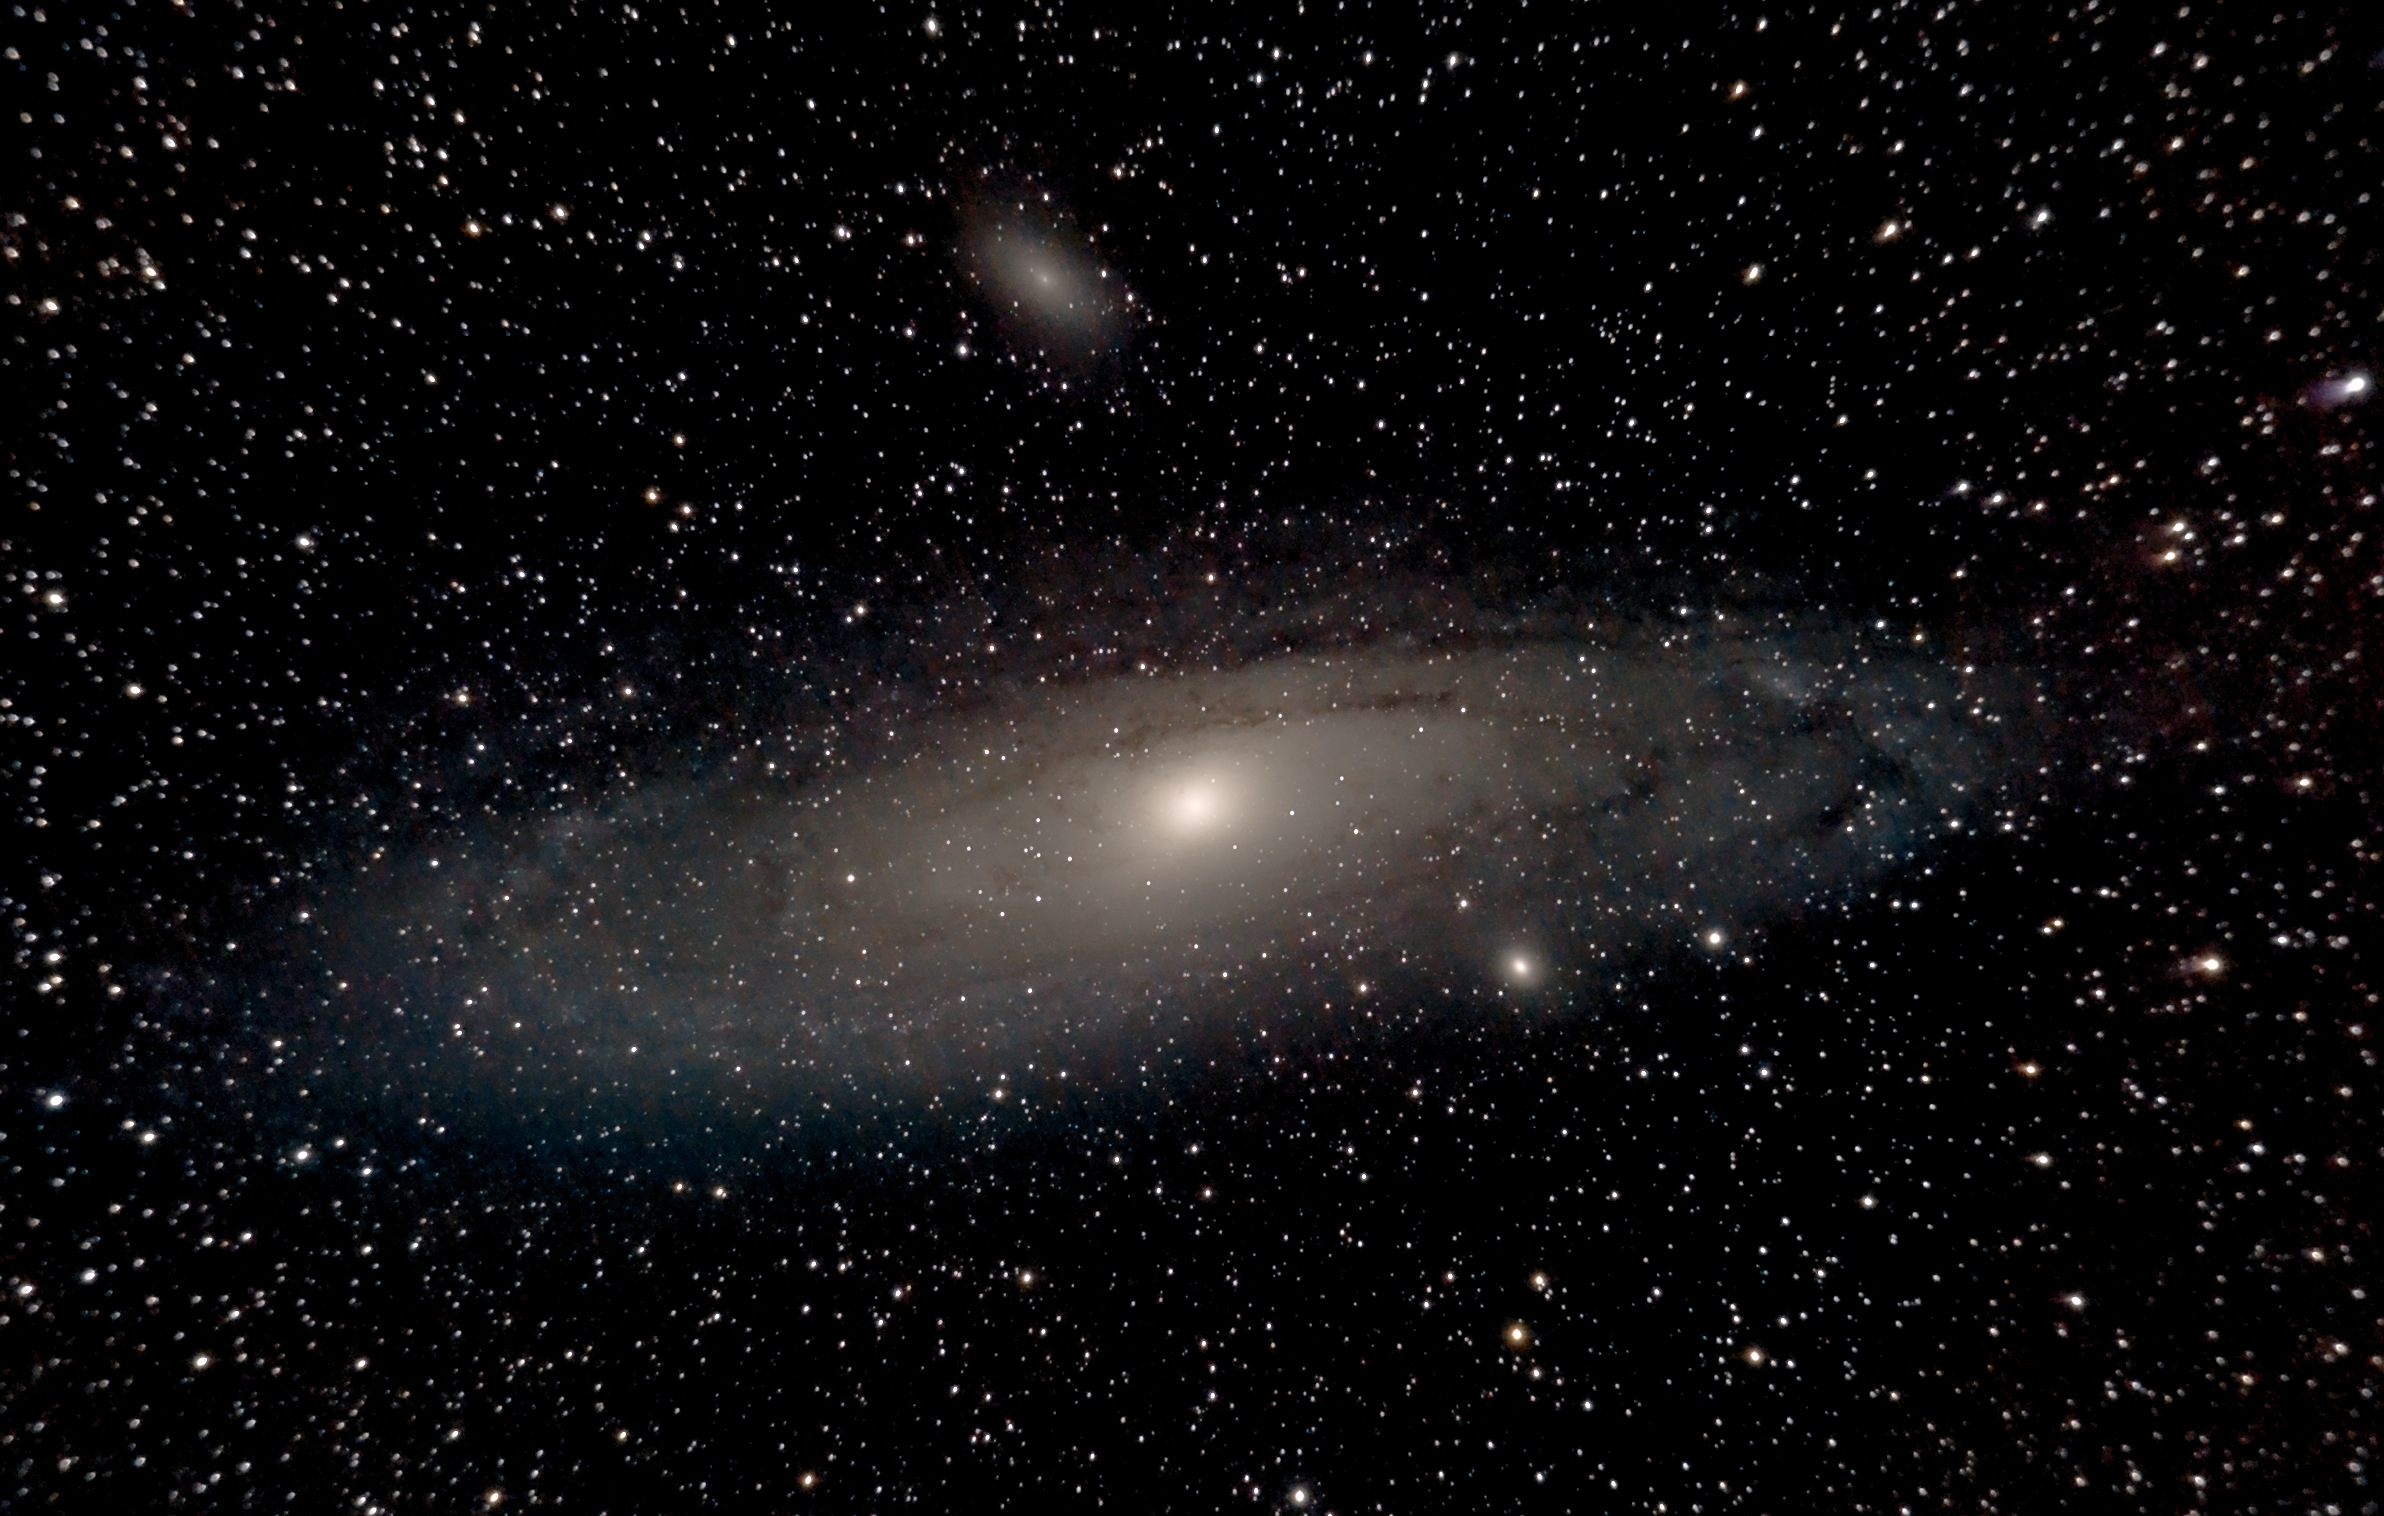
- Subject: Andromeda (M31)
- Camera: Sony A7S II
- Telescope: Astro-Tech AT72EDII
- ISO: 640
- Shutter Speed: 60”
- Light Frames: 100
- Dark Frames: 20
- Flat Frames: 20
- Offset Frames: 20
- Software: Pixinsight - DynamicCrop, DynamicBackgroundExtraction, Background Neutralization, Color Calibration, SCNR noise reduction, Histogram Transformation, Curves Transformation, Unsharp Mask
I also took a stab at the Veil Nebula:
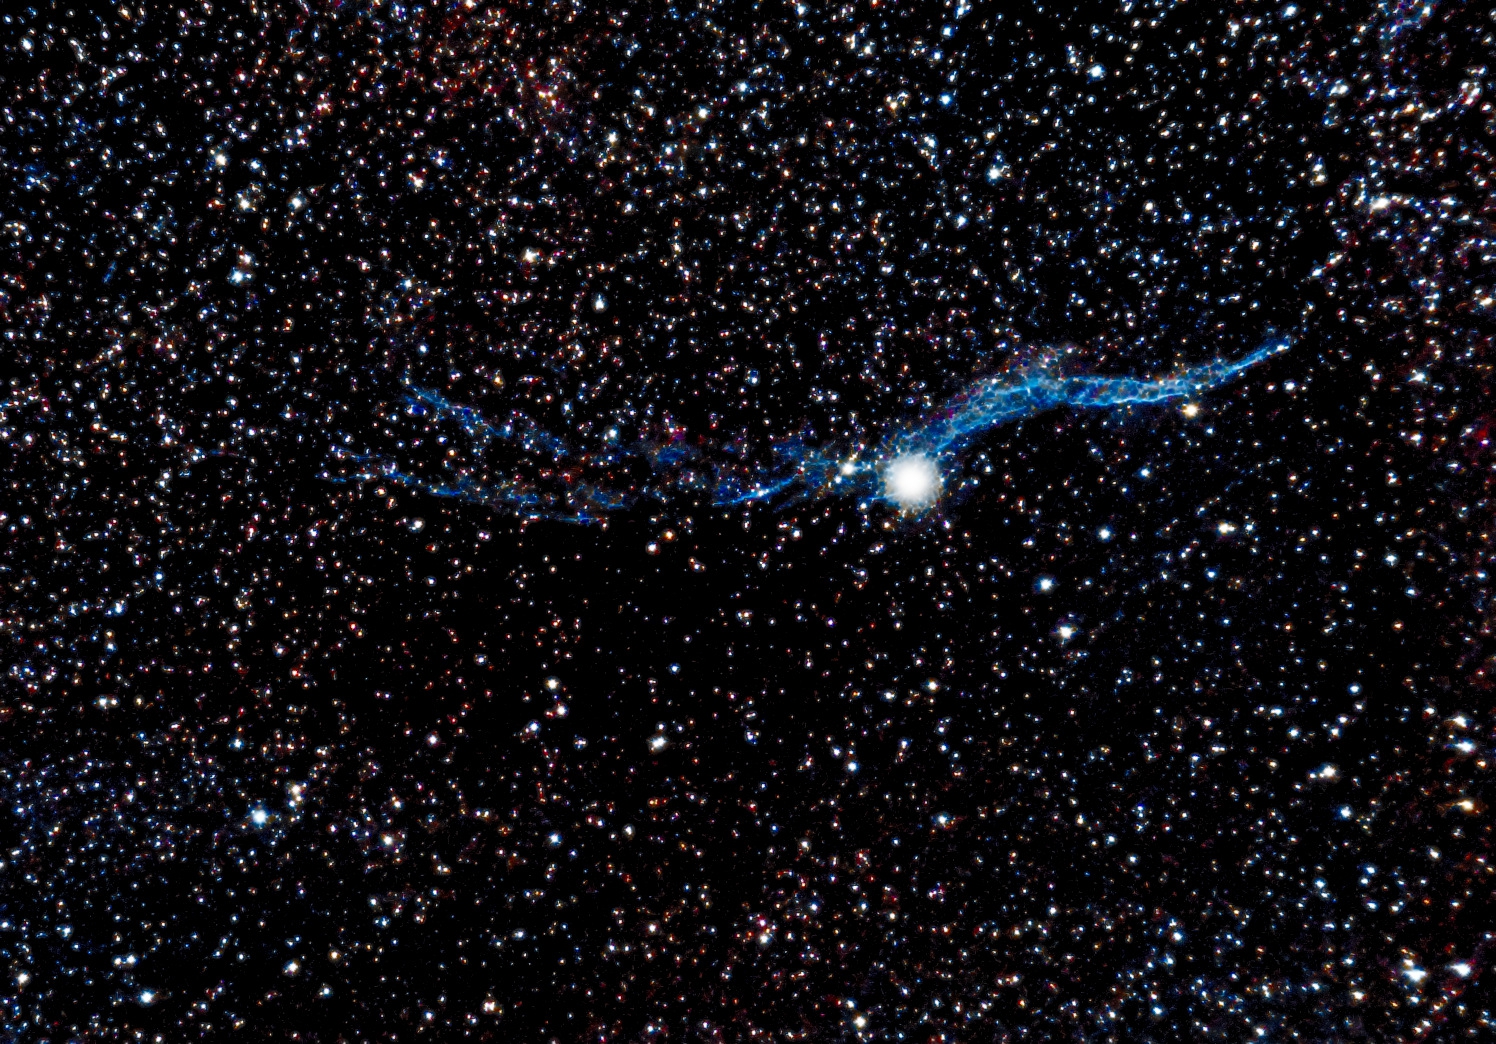
- Subject: Western Veil Nebula
- Camera: Sony A7S II
- Telescope: Astro-Tech AT72EDII
- ISO: 640
- Shutter Speed: 60”
- Light Frames: 100
- Dark Frames: 20
- Flat Frames: 20
- Offset Frames: 20
- Software: Pixinsight - DynamicCrop, DynamicBackgroundExtraction, Background Neutralization, Color Calibration, SCNR noise reduction, Histogram Transformation, Curves Transformation, Unsharp Mask
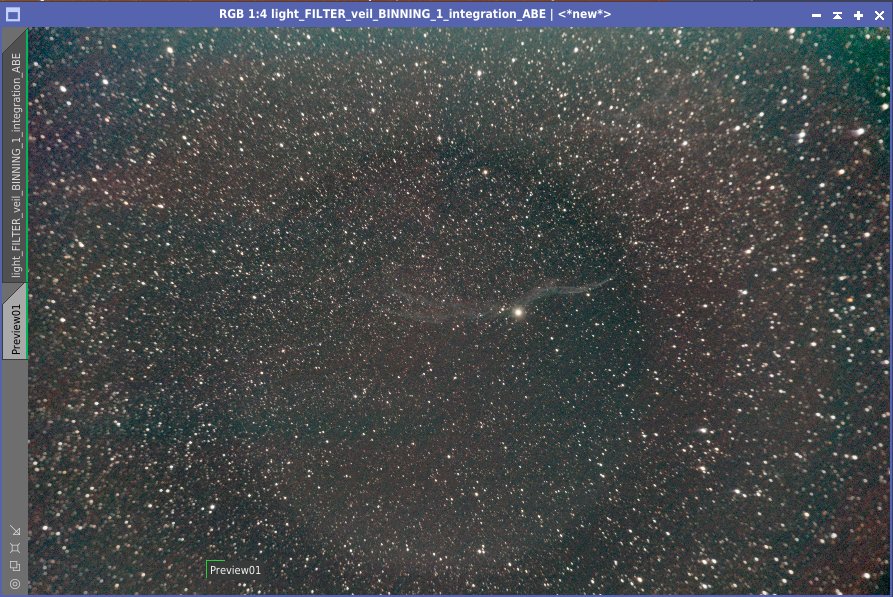
I was amazed I got any nebulosity, but here is where I started to run into a roadblock. After doing the normal background extraction, I was seeing a lot of leftover noise. Noise that I couldn’t explain as being from light pollution – it was weird, ugly red splotches of noise. Thus, the results I got of the nebula were compromised by having to clip a lot of signal to get rid of the noise. I am not certain what the cause is yet, but the pattern seemed to have a circular-ish pattern, leading me to think there was some problem with my flats:
Sunday night looked to be my last chance for clear skies, so I gave Andromeda another shot. This time I opted to finally try the 2” adapter sans filter. I had good luck with a much bigger data set, so this go round I went big for 120 exposures at 60”, which would about push the limit of my battery life. It came out pretty great, despite still fighting a lot of noise (more still on that below). I even managed to get some color from this, though I think that had as much to do with post processing as it did with data acquisition:
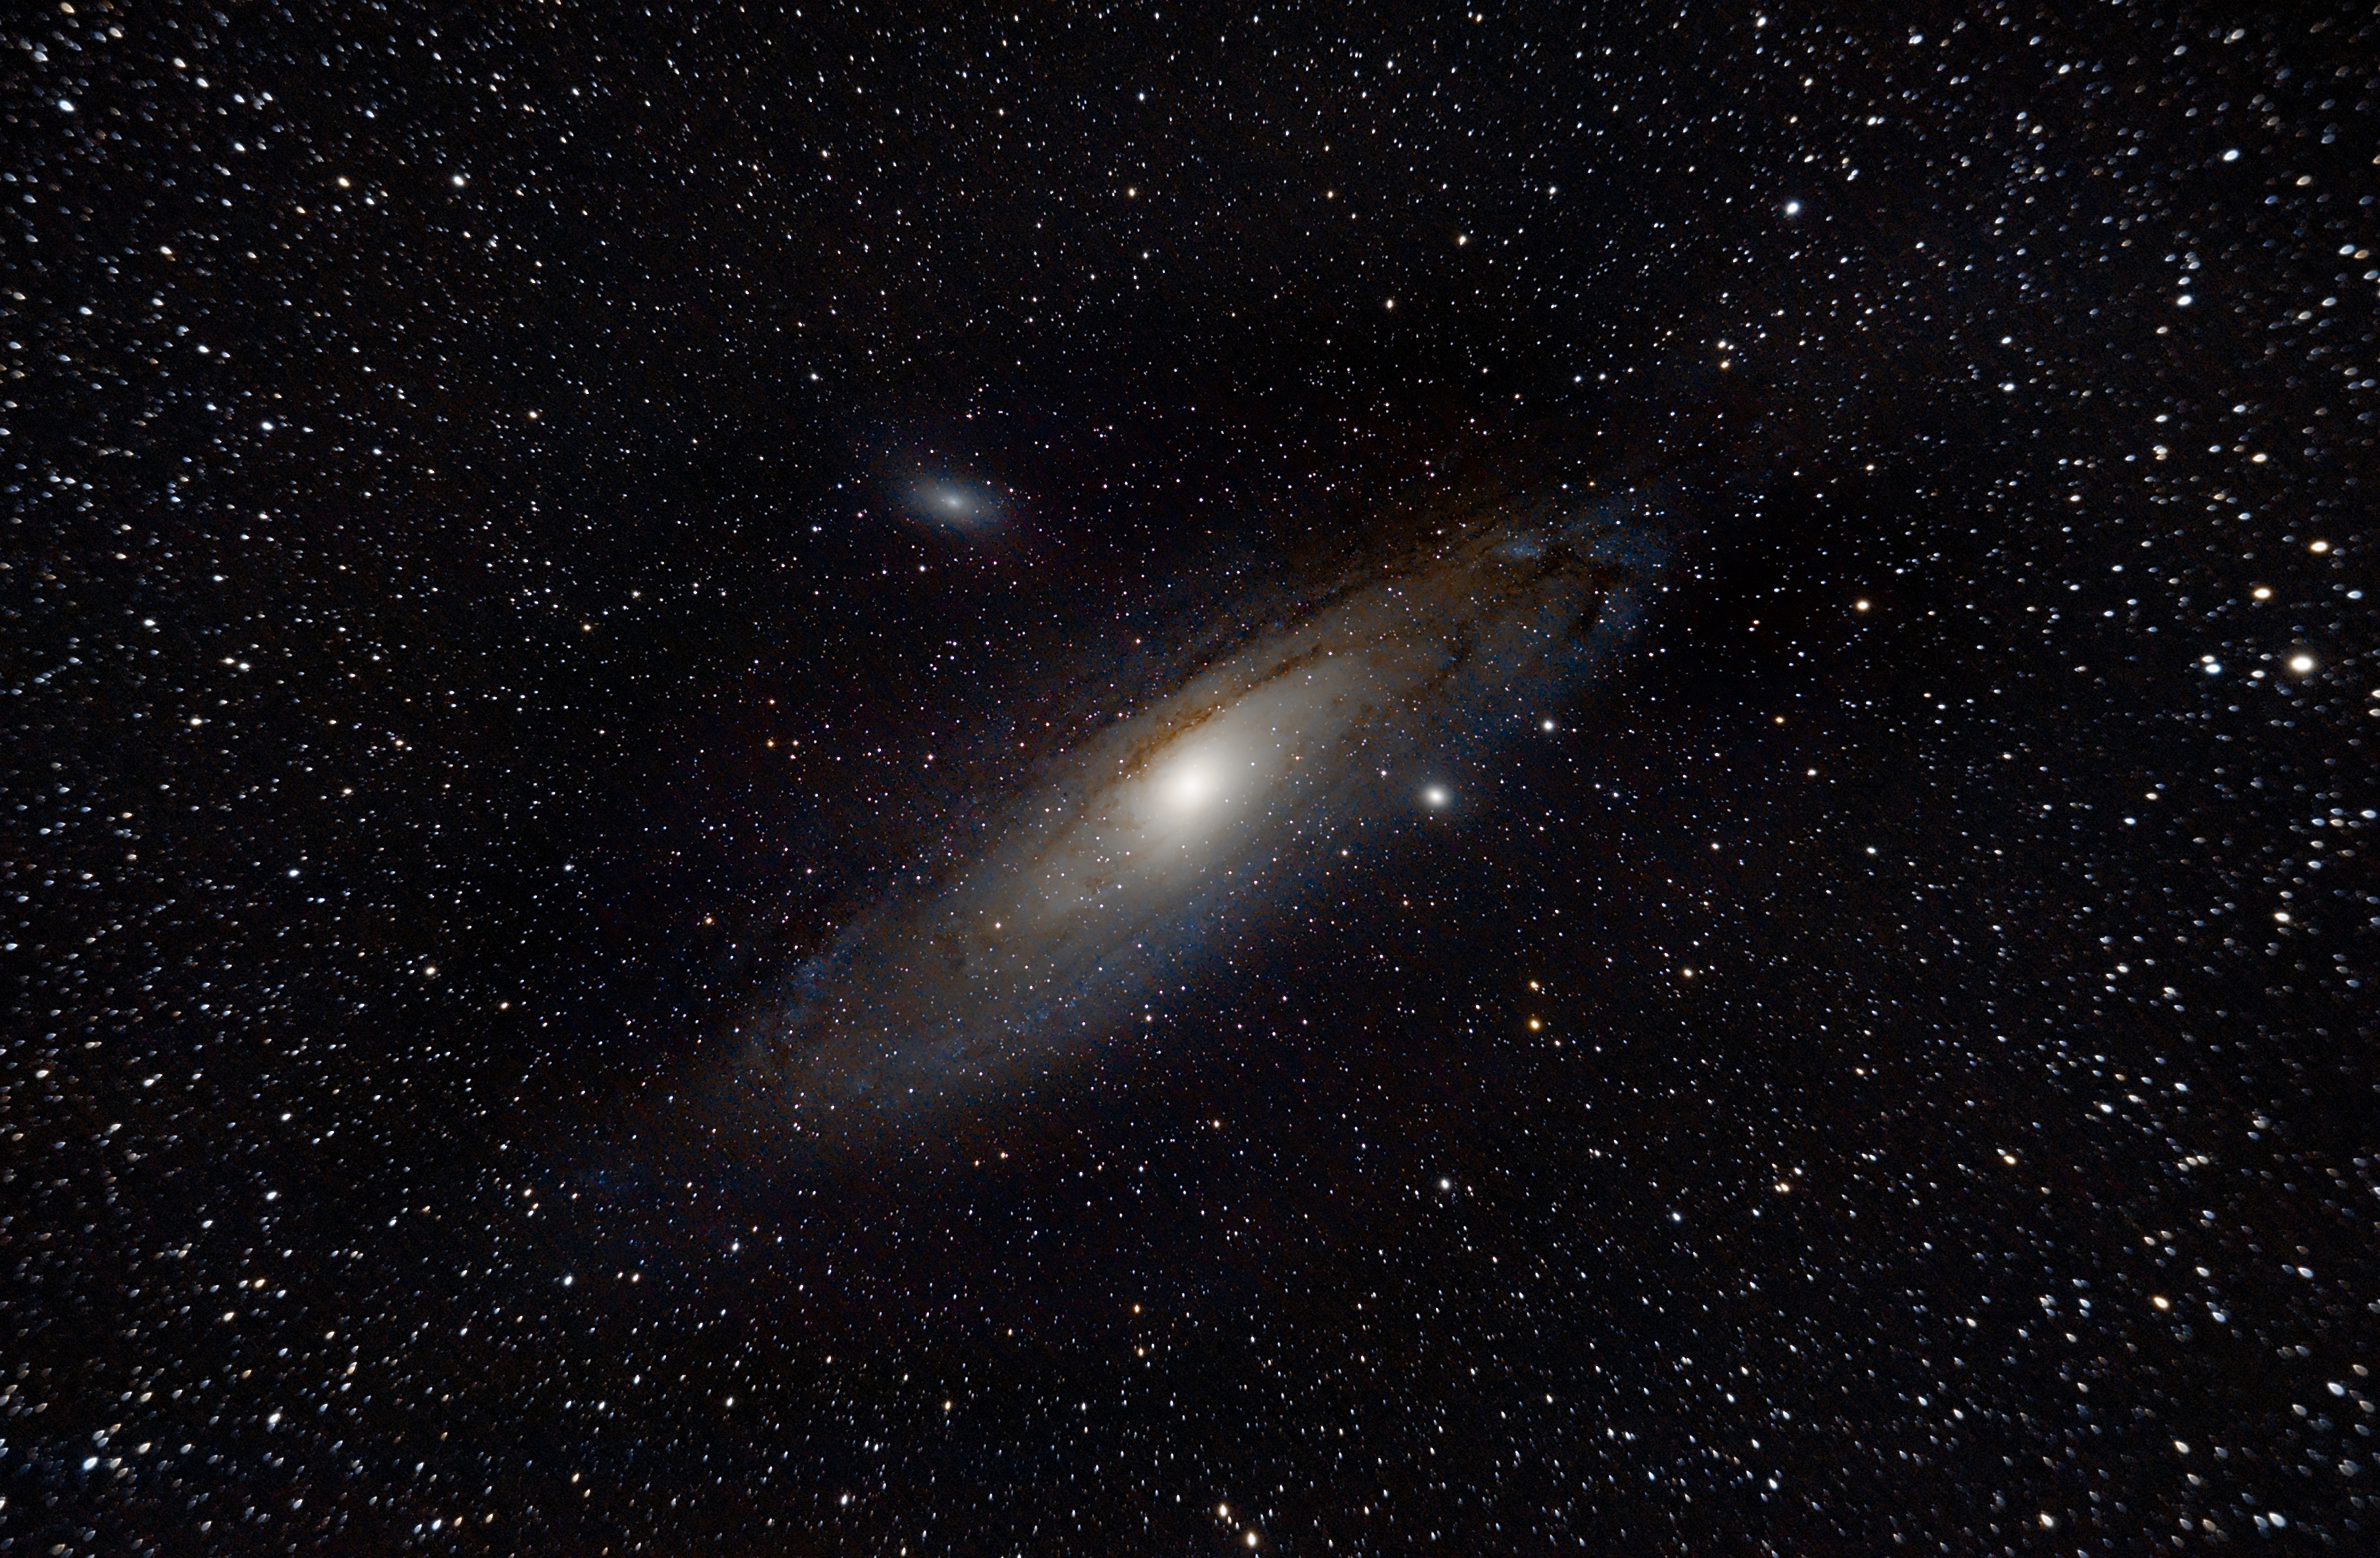
- Subject: Andromeda (M31)
- Camera: Sony A7S II
- Telescope: Astro-Tech AT72EDII
- ISO: 640
- Shutter Speed: 60”
- Light Frames: 120
- Dark Frames: 20
- Flat Frames: 20
- Offset Frames: 20
- Software: Pixinsight - DynamicCrop, DynamicBackgroundExtraction, Background Neutralization, Color Calibration, SCNR noise reduction, Histogram Transformation, Curves Transformation, Unsharp Mask
This is easily my best result so far, and so I’m proud of it, but this is where things started to go off the rails a bit. I had some time left, so I decided to try M33 (Triangulum) again. I did roughly the same process (100 lights at 60”, 20 darks, 20 flat, 20 offset). However, during post-processing I encountered the same noise problem – and because M33 is so much smaller on my sensor, it made getting anything usable out of the data almost impossible. No amount of background extraction or noise reduction could get rid of it:
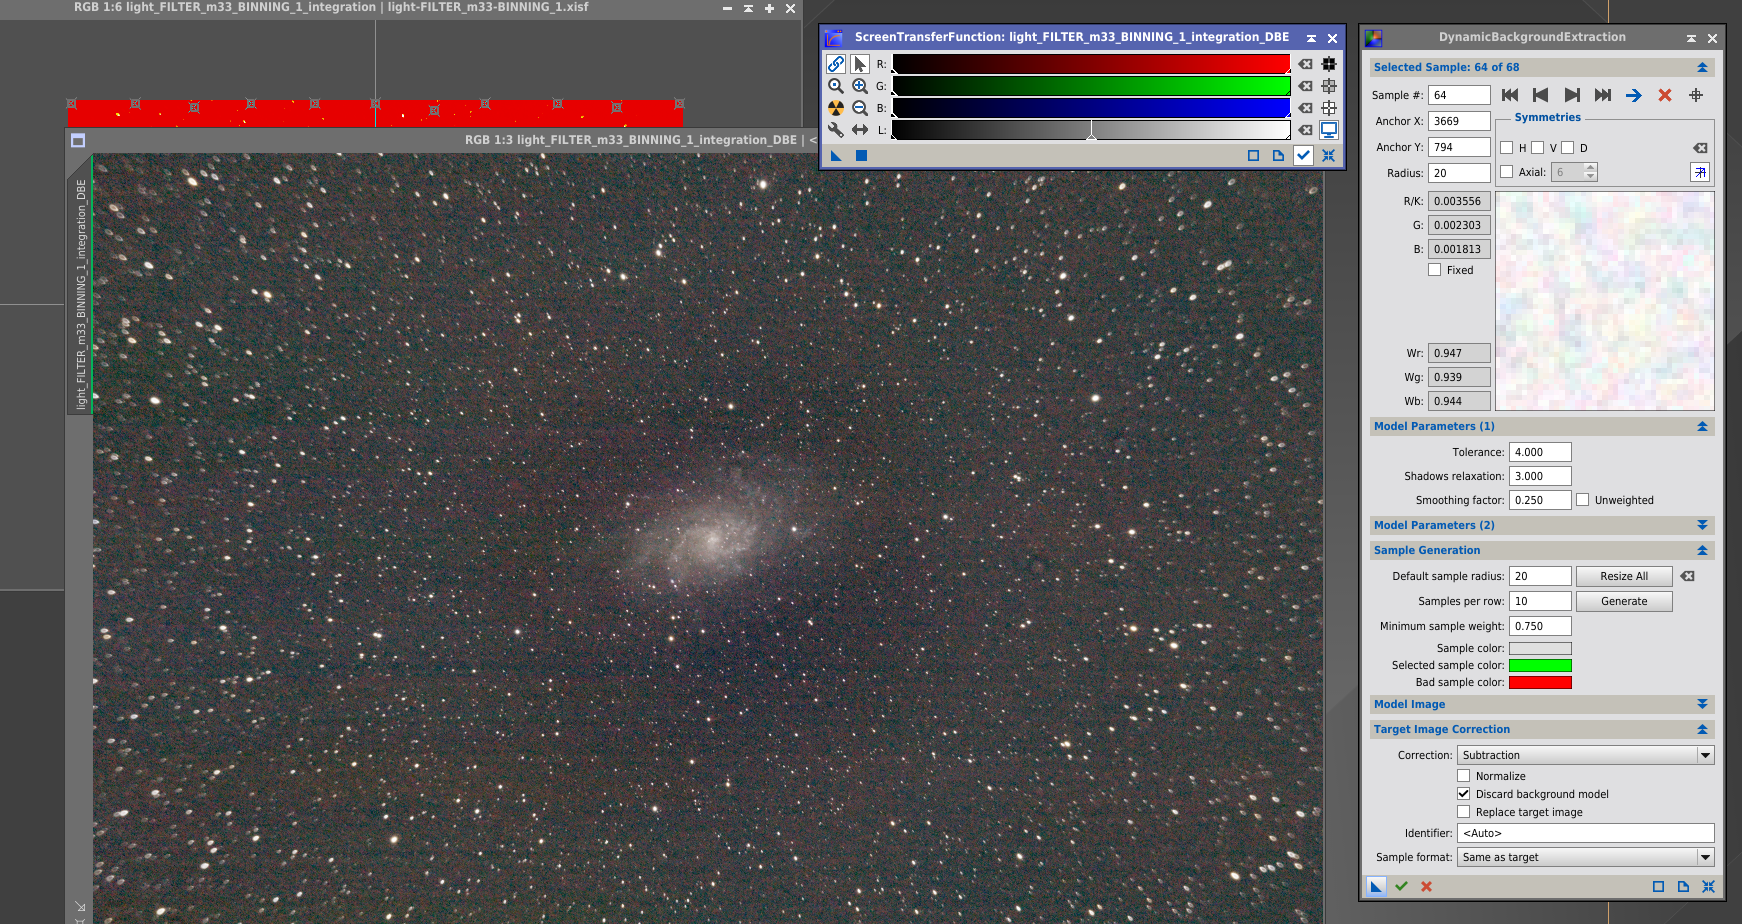
There was probably something miserably salvageable from this data, but I ended up giving up. I even sent the source data to someone in the /r/astrophotography discord, who generously offered to take a stab at it and even he gave up. You can watch it here if you’re particularly masochistic.
I am a bit frustrated because this is a problem I don’t know how to solve. The aforementioned person indicated he thought my flats were bad over and over and I am inclined to trust him, though I’m not sure how/where I’m going wrong. My current process is:
- Lights: (pretty obvious, point at stars, do exposures)
- Darks: put the cap on the telescope dew shield, repeat exposures (I’ve been doing 20, maybe not enough, but I don’t think it explains this)
- Offsets: set camera to lowest possible shutter speed (1/8000s in the case of my camera), do 20 exposures
- Flats: I rigged up a cheap LED tracing pad inside its box with a hole cut out for the dewshield of my telescope so I could just place it on top of the dewshield to provide a flat white surface to take photos of. Set camera to Aperture priority mode, leave everything else the same, take 20 exposures.
Current theories:
- putting the LED thing so close to the lens element means I have to dim it to its lowest so I can get at least somewhat longer exposed flats (usually around .125/.10s). the low LED setting is maybe causing subtle flickering resulting in variance in the flats (I can’t see any, but it’s still possible)
- putting the LED thing so close to the lens element means I’m getting weird reflections inside the barrel from incidental light
- some mystery setting or factor in my Sony camera’s compress raw data means the pixel math being done with the flats, darks and/or offsets is resulting in this weirdness (???)
- … something else
I think my next strategy is going to be taking the flats by simply setting up the tracing pad a few feet from the scope and pointing it at it, rather than just plopping it on top, operating on the theory that one of or both of the first two theories is affecting things. Fingers crossed for next time!